Showing posts with label Recipes. Show all posts

Friday, February 22, 2013

Your waistline will hate me for this - Olive Garden breadsticks copycat recipe


I could eat my weight in these fluffy garlicky beacons of deliciousness. When we eat at the Olive Garden and the server {rhetorically, amirght?} asks if we'd like more breadsticks I've answered in the affirmative before he's even finished asking the question. And then I shove 2 or 3 or 4 into my piehole. Mike usually sits there in awe...or disgust? Not sure. Hopefully the former. Anyway, this recipe is awesome.

Olive Garden copycat breadsticks

Printable Version - adapted from Full Bellies, Happy Kids

Dough Ingredients:
1 1/2 cups warm water (between 110 - 120°F)
1 package active dry yeast
4 cups flour (+ some for kneading)
2 tablespoons unsalted butter, melted
2 tablespoons sugar
2 teaspoons salt

Basting Ingredients:
1 stick unsalted butter, melted
2 teaspoons garlic powder
1 teaspoon salt

Pin It!

Ingredients, breadstick ingredients
Ingredients
In a large bowl, dissolve sugar and yeast in warm water. Allow to sit, covered, for 10 minutes. Combine flour and salt in a separate bowl, and then add to the yeast mixture. Add melted butter.


Mix with a wooden spoon (like I did) or the paddle attachment of a stand mixer until fully combined.


And then I was so excited about eating these that I forgot to take photos of the next few steps. Sorry. I'm sure you understand ;)

Knead dough for a few minutes until just smooth. Avoid overkneading. Grease a cookie sheet and pull off pieces of dough, and roll into breadsticks. As you can see below, I'm not a stickler for making sure they are all the same size or pretty looking since they end up in my mouth about 30 seconds after they're done baking. Depending upon how large you make them, you can end up with ~10-14.

Cover the dough and let sit in a warm place for 45 minutes to an hour. I turned on my oven to the lowest possible temperature, and then shut it off after 5 minutes and stuck them in. After the time is up, preheat the oven to 400°F.

Pop them in and get your butter mixture ready: combine melted butter, garlic powder, and salt. After 6-7 minutes of baking time, baste the breadsticks with half of the mixture.

Baking breadsticks, Olive Garden breadsticks
ALMOST DONE
After another 6-7 minutes, baste 'em again and EAT.

Olive Garden breadsticks, Olive Garden copycat breadsticks, copycat breadsticks
They might not be as pretty, but I promise you they are SO GOOD
And then eat some more.

Every time we make them I reduce the amount of salt a little because they are still a little salty for my taste. Let me know if you find the perfect amount. Enjoy!


Click To Vote For Us @ Top Baby Blogs Directory!

Thursday, February 7, 2013

Blueberry Scones - Guest Post


Hi all! My name is Amanda and I'm visiting from 10 Years Later.

I am wife to Eric.


and Mom to Eliana


How does a pretty simple recipe for crazy tasty blueberry scones sound to you?

Good? Right. That's why I'm here!


I have always been intrigued by the thought of baking my own scones. Intrigued but afraid. They are such a specific density and nothing else even closely resembles them. I'm no Martha so I fo sho thought it was out of my realm of capabilities. I am happy to report that I was wrong. They were surprisingly easy to make and way easy to eat. Yum yum yum!

Pin It!
I found this recipe via Pinterest which led me to La Petite Brioche.

Ingredients:

2 Cups all-purpose flour
1/2 Cup sugar
1 Tablespoon baking powder
1 Teaspoon kosher salt
1 Tablespoon grated orange zest
1 Stick cold unsalted butter, grated
1 Large egg, lightly beaten
1/2 Cup cold heavy cream
1 Cup blueberries, fresh or frozen
Extra heavy cream for brushing the tops
Raw sugar for sprinkling the tops

Directions:

1. Preheat oven to 400F

2. Using an electric mixer fitted with the paddle attachment, mix 2 cups of flour, 1/2 cup sugar, the baking powder, orange zest and salt. Mix on lowest speed until combined.

3. Add the cold butter and mix at lowest speed.

4. Combine the egg and heavy cream and, with the mixer on lowest speed, slowly pour into the flour & butter mixture. Mix until just blended. The dough should look lumpy.

5. Add the blueberries to the dough and mix on lowest speed until blended.

6. Dump the dough onto a well floured surface and knead it into a ball. With much flour on your hands and on the rolling pin, roll the dough 3/4" thick. You should see small bits of butter in the dough. Keep it moving so it doesn't stick.

7. Shape dough into a square. Cut the squares into quarters and then cut again into eights, diagonally, making triangles.

8. Brush the tops of the scones with heavy cream. Sprinkle with sugar.

9. Bake for 20-25 minutes, until the tops are browned and the insides are fully baked. They will be firm to the touch.

10. Enjoy!

Just a quick note to give you my adjustments as I'm anything but easy going. I didn't have an orange to zest so I substituted it for 1/2 tablespoon of some bottled grated lemon peel. I also didn't have 1/2 cup of heavy cream. I made a substitute by combining 3/8 cup milk and 1/6 cup melted butter. I just stuck it in the fridge for a few to cool it. I had planned on drizzling them with a homemade icing, but they were plenty sweet and delish without.

I hope you are all efficiently salivating and preheating your ovens. Thanks for letting me share!


Thanks for sharing, Amanda! Carina is obsessed with blueberries and will go crazy for these.

Thursday, October 18, 2012

Making Lunch Time Fun Again - Guest Post


Hi Growing Up Geeky readers! My name is Lindsay and I blog over at You Are The Roots! It's such an honor to be posting here today -- Melissa's blog is one of my favorites! I'm a first-time mom to a 14-month old little boy, Ethan, living down in southeast Florida. As all mothers of toddlers know, every day is an adventure -- so much so that I started to find that Ethan's lunches weren't nearly as spectacular as he deserved. I'm not exactly skilled in the kitchen but I found that between a nutritious breakfast and a healthy-but-delicious dinner was a pretty dull lunch. I made a promise to myself to step it up a notch and offer fun and nutritious lunches that were still fun for a toddler and realized that the answer to all of my problems rested in the hands of a muffin tin. I thought I'd share some of my favorite toddler-friendly recipes with you all today!

Toddler Veggie Quiches


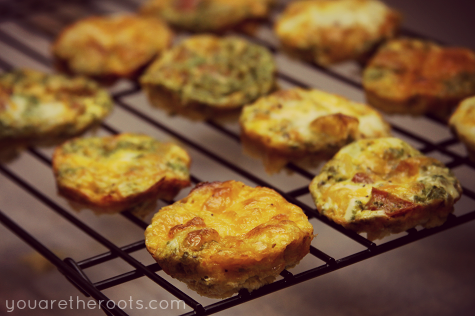
These tiny little veggie quiches are as healthy as they are cute. I love that these freeze well and store well, making them perfect to always have on hand when you find yourself on the go. For these, choose any three vegetables you want (or happen to have on hand). I used some of Ethan's favorites: kale, tomato and carrot.

In addition to your veggies of choice, all you need is milk (1c), a few shakes of black pepper, dried mustard (1 tsp.), 4 eggs and your favorite cheese (3/4c).
I use my trusty Baby Bullet to chop the veggies up oh so small and then pile them into a greased muffin tin.


From there, mix your eggs, cheese, milk, pepper and mustard together until combined and pour over the veggies. Stick in a preheated oven at 375 degrees and bake for 20-25 minutes until bubbly! Perfectly portioned toddler lunch (or breakfast) in minutes!

Carrot & Zucchini Muffins


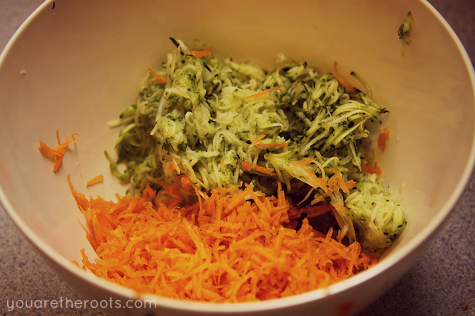
I love these little guys because you can pack a lot of veggies into them (see?!) and the little ones still look at them as a sweet treat and midday snack.

I use a hand grater to shred a whole zucchini and a whole (peeled) carrot. In addition to the veggies, you also need canola oil (1/4c), brown sugar (1/2c), 1 egg, applesauce (3/4c), all-purpose flour (1c), whole-wheat flour (3/4c), cinnamon (1 tsp.) and nutmeg (1/2 tsp.). You simply whisk together the oil and sugar, then add the egg, applesauce and your vegetables. In another bowl, combine all of your flours, cinnamon and nutmeg. Fold your dry ingredients into the wet ingredients and combine, but be careful to not stir too much! Pour the batter into muffin cups and bake for 20 minutes in a (preheated) 400 degree oven.

Quinoa & Cheese Spinach Muffins


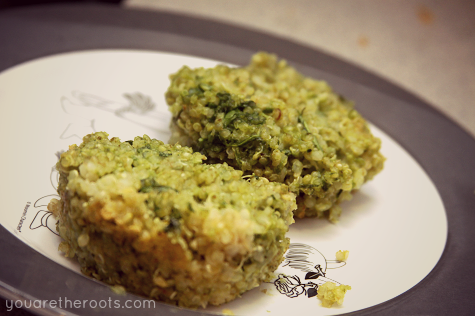
The last toddler-recipe I wanted to share today is definitely one of Ethan's favorites. Instead of regular macaroni, I used quinoa to make these delicious, cheesy spinach muffins!

I again use my trusty Baby Bullet to finely chop up fresh spinach leaves. I use organic baby spinach leaves, but you can also used cooked or frozen spinach. You also need cooked quinoa (3c cooked), your favorite shredded cheese (I used a mild cheddar), whole-wheat breadcrumbs (1/4c) and sour cream or milk (I used sour cream). Once your quinoa is cooked and still warm, remove from heat and throw in a handful of your shredded cheese. Stir until melted and smooth. Add 1 teaspoon of milk or sour cream and continue to stir until combined. Add your breadcrumbs to the quinoa mixture and then fold in your spinach. Pour into greased muffin cups and bake in a (preheated) oven at 400 degrees for 15 minutes.


Happy lunches to you and your toddler and thanks for letting me blog over here today!
 You Are The Roots


Thanks, Lindsay! I think that Carina will LOVE the veggie quiches.

Friday, September 21, 2012

Super easy chocolate fudge - you'll want to eat all of it


I can eat fudge by the pound. I'm {certainly} not proud of that, but hey, at almost 40 weeks pregnant? I do what I want ;)

Back in Madison I was sort of famous for my fudge amongst Mike's lab mates. They asked for it quite often and I was happy to oblige every now and then. That is, when I didn't eat all of it first! This recipe doesn't require a candy thermometer or even a watchful eye so it is just perfect for those of you who {like me} want amazing dessert with minimal effort.

Chocolate Fudge

Printable Version - adapted from the Eagle Brand fudge recipe

Ingredients:
2 1/2 cups semi-sweet chocolate chips
1 (14 ounce) can of sweetened condensed milk
1 1/2 teaspoons vanilla extract

Pin It!
Semi-sweet chocolate chips, vanilla extract, sweetened condensed milk
Yep - this is it: 3 ingredients
 In a saucepan, combine chocolate chips and sweetened condensed milk. Melt over low heat.

Melting chocolate chips
Chocolate chips mellllttting in the condensed milk!
Once melted, remove from heat and add the vanilla extract. Stir until smooth. It's okay if it's still a tiny bit chunky.

Fudge
All mixed together
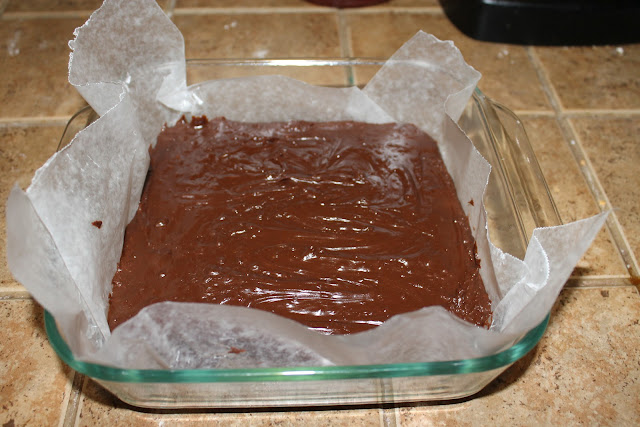
Pour the chocolately goodness into a 8x8 or 9x9 baking dish lined with wax paper.

Fudge
All ready for the fridge!
Allow to cool in the fridge for 2 hours or until firm. After, remove from pan, peel off the wax paper, cut, and SHOVEL IT IN!

Easy fudge, fudge cubes, fudge squares
It's amazing. Trust me.
Feeling adventurous? You can do so much with this recipe. I've tried:
  • Adding a couple handfuls of marshmallows and/or walnuts after stirring in the vanilla
  • Creme de menthe extract instead of vanilla
  • Half semi-sweet chocolate chips and half white chocolate
One year money was really tight for Christmas so we gave all of our friends a cute tin filled with a variety of different types. Makes for a cheap and easy (but oh-so-good!) gift.

Click To Vote For Us @ Top Baby Blogs Directory!

Monday, August 27, 2012

Crock Pot Buffalo Chicken Wraps - Toddle Along Tuesday


I'm pretty much in the drop zone now; this baby could come at any time! So, I'm on the lookout for some quick and easy meals to add to my list. Because hey, what new Momma (or Dad!) wants to spend hours slaving away over the stove? Here's one of my favorites. So good and so easy. It has been one of my top pregnancy cravings throughout this whole 9 months.

Crock Pot Buffalo Chicken Wraps 

Pin It!Printable Version


Ingredients:
1 lb boneless skinless chicken breasts
1/2 cup buffalo wing sauce (we use Ken's Marinade)
3/4 cup ranch dressing
sprinkle of salt
tortillas
shredded lettuce
shredded cheddar cheese (optional - I lurve me some cheese)
diced tomatoes (optional)

Place chicken in crock pot and sprinkle with salt. Cover and cook 5-6 hours on low. Sometimes we use smaller chicken tenders and these usually only take 3 hours or so. Basically, you want it tender enough to shred with a fork. After discarding the liquid in the crock pot and shredding the chicken, put it back in the crock pot and add the buffalo sauce and the ranch dressing. If you like yours really spicy, you could add more buffalo sauce.

Buffalo chicken
Mixing chicken with ranch dressing and buffalo sauce
To serve, place an amount {to your liking} of the chicken mixture, lettuce, and cheese on the tortilla and wrap it up. Sometimes we add fresh tomatoes, too.

Crock pot buffalo chicken, buffalo chicken
YUM


This week's Toddle Along Tuesday co-host is Victoria from Smiles 'N' Snuggles and the topic is easy go-to meals! Victoria and I are due just a few days apart and are looking for some quick & easy recipes we can make when baby is here. There are no rules here, except that you link up a relevant post (old or new) rather than your whole blog.


Next week's topic is Mommy and me! Show off some cute photos of you and your little one, and/or write about your relationship!

If you like advance notice for TAT, check out the bottom right of my blog - topics for the next couple months are listed. Would you like to submit a topic idea and/or volunteer to co-host one week? E-mail me!

Click To Vote For Us @ Top Baby Blogs Directory!

Tuesday, July 24, 2012

Deep Fried Awesomeness: Mozzarella Sticks


I see you there, wanting me.

Don't try to resist.

::drool::
Mozzarella sticks are one of my {many} weaknesses. Growing up I would take the money I saved from babysitting and head to the Friendly's Restaurant in my town for their $3.49 Mozzarella sticks on a regular basis. So.freaking.good. This recipe is as close to them as you can get, in my opinion.

Mozzarella Sticks - Printable Version!
Ingredients:
12 cheese sticks (or cut up chunk mozzarella, if you prefer)
1/4 cup flour
2 eggs1 tablespoon milk
1 cup Italian Style bread crumbs
oil for frying

Ingredients
If deep frying, heat the oil in your deep fryer or pan to 365 degrees as you prepare the Mozzarella Sticks. Cut string cheese in half (or chunk mozzarella into about 1/2 inch by 1 1/2 inch rectangles). Whisk milk and eggs together in a bowl, and put flour on one plate and breadcrumbs on another.
Cheese and other ingredients ready to go!
Coat each stick in flour, then dip in the milk/egg mixture, and then roll in breadcrumbs. Then here is the secret - dip each stick (already covered in breadcrumbs) BACK in the egg/milk mixture, and in the breadcrumbs once more. This extra layer means that less cheese will escape while frying.
Coat well in each ingredient
Put the sticks in your fryer basket being careful to give them some space. I find that 7 sticks fit perfectly in my Cuisinart Mini Deep Fryer. Fry for about 1 minute, but check them around 45-50 seconds and take out if the cheese is escaping. OR if you pan fry, use about a cup of oil and cook for about a minute on each side. Drain on paper towels.
My deep fryer - aka my second lover
Ummm....yum? Enjoy with marinara or just shove them into the ol' pie hole plain, like I do ;)
Heavenly cheesy goodness
Pin It! Since you need quite a bit of oil for this, I always recycle mine. I put a coffee filter inside a funnel in the opening of an empty vegetable oil container. The oil filters through (sans breadcrumbs and gunk) and you can use it again and again. My only exception is seafood - it smells too awful to save in that case ;)

Good news! I have added Printable Versions of my recipes to all of the recipes I have published (which isn't many...as I fail at cooking most of the time). If you're interested, here's what I've got:

Click To Vote For Us @ Top Baby Blogs Directory!

Friday, April 13, 2012

Success with vegetables: Mushroom Gnomes


This post is sponsored by Country Crock. I was selected for this opportunity as a member of Clever Girls Collective, and the content and opinions expressed here are all my own.

We really struggle with getting Carina to eat much of anything at all. Lately, our biggest issue has been vegetables. Despite drenching her broccoli in cheddar cheese or covering her green beans in olive oil, she doesn't really seem to have much interest in eating them. She would rather smear them around her highchair tray or drop them off of it and squeal in delight as they go "splat" on the floor.

I consider myself to always be on the lookout for fun and different ways to serve food, with the hopes that it might actually reach her mouth (and hopefully won't get spit out). I was excited to download and look through the {free} Clare Crespo Digital Cookbook. It contains 25 creative ways to serve veggies for kids. Since Carina has actually taking a tepid liking to mushrooms, I crossed my fingers and decided to try the Mushroom Gnomes recipe.

Mushroom Gnomes - Printable Version!

Ingredients:
12 large white button mushrooms
12 mini red or orange sweet peppers
3 sprigs curly parsley
2 Tbsp. Country Crock® Spread
3 cloves garlic, minced
1/4 tsp. salt
3 Tbsp. water
A squeeze of lemon juice
12 toothpicks or skewers

Trim stems of mushrooms even with the bottoms of the mushrooms. Trim some of the stem into very tiny pieces for “noses".
Cap-less mushrooms
Trim caps off peppers and scrape out seeds. Save 24 seeds. Cut parsley sprigs into tiny 1/4-inch pieces and bigger 1-inch pieces.
De-capped and de-seeded sweet red peppers
Melt Country Crock® Spread in a large nonstick skillet over medium heat. Add mushrooms, garlic, and 1/8 teaspoon of the salt and sauté until mushrooms are beginning to color, about 5 minutes.
Sizzling mushrooms. I could not believe how amazing this smelled while cooking.
Turn mushrooms stem-side down. Add water; cover and cook over low heat until cooked through, about 10 minutes. Remove mushrooms with tongs and place in a serving dish. Add peppers and remaining 1/8 teaspoon salt to skillet. Cook until crisp-tender, about 5 minutes. Remove from heat.

Place a long toothpick into a pepper and stick on top of mushroom with tip sticking out of the pepper. Arrange larger parsley pieces as “beards” at the base of each mushroom. Stick two pepper seeds on each mushroom as “eyes.” Add tiny parsley “eyebrows.” Stick tiny pieces of mushroom stem on as noses.
The finished product, my gnomes!
Pin It! These were fantastic, and Carina ate a couple of them...success! M and I ended up soaking up the leftover cooking liquid (laced with garlic and Country Crock® mmmm...) with the mushrooms and peppers and it was delicious. M usually isn't a mushroom fiend like me, but he went to town on these! We plan on making them again in the future, maybe for a party or when we have Carina's cousins visiting in the near future. I think these are definitely a fun and creative way to serve veggies to kids.

Are you looking for quick and simple tips and recipes to make serving veggies more fun? Download the free Clare Crespo Cookbook here for fun and whimsical recipes your family is sure to love!

Photobucket

Tuesday, March 13, 2012

Toddle Along Tuesday - Mubbins's Famous Apple Crisp

I'm sort of cheating, here, as I have not actually given this to Carina yet. I planned on it a couple weeks ago, but it was so freaking good I ate the whole pan the night I made it. Oops. I know she is going to love it, though. The apples come out so soft and warm, and the brown sugar and oats add just the perfect amount of sweet and {sort-of} crunchy.

And if you're wondering who "Mubbins" is, that would be my Mom. We love ridiculous nicknames in my family ;)

Mubbins' Apple Crisp - Printable Version!
Ingredients:
6-7 medium tart apples
¾ cup packed brown sugar
½ cup flour
½ cup oats (not quick-cooking)
¾ tsp. cinnamon
¾ tsp. nutmeg
1/3 cup butter, softened (or melted)

Ingredients
Preheat oven to 375° and grease a 9x13 pan. Mix everything but the apples in a bowl.
Pre-mixing
Pare and slice the apples. Place apple slices in pan.
Apples in pan, and the rest of the ingredients post-mixing
Sprinkle the topping over the apples.
It's best to break up the topping in your fingers as you go so it doesn't get too lumpy
Bake 30 minutes or until apples are tender and topping is golden brown. Serve warm, and if desired, with ice cream or whipped cream.
NOM

Pin It!


My co-host for Toddle Along Tuesday this week is The How To Mommy, and this week's topic is baby/toddler recipes! Share your favorite recipe for your little one. There are no rules, except that you link up a relevant post rather than your whole blog. Find some recipes you like? Feel very free to pin them on Pinterest!


Next week's topic is your child's favorite activity! Whether it's a toy, game, craft, or thing to do...let's share some fun stuff with each other. Would you like to submit a topic idea and/or volunteer to co-host one week? E-mail me!

Photobucket

Related Posts Plugin for WordPress, Blogger...